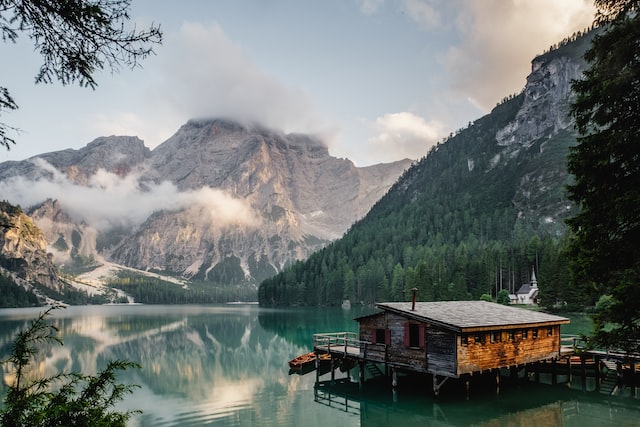
Capturing stunning landscape photos can be a challenging but rewarding experience for photographers of all skill levels. Whether you’re an amateur photographer just starting out or a seasoned pro looking to improve your craft, there are a variety of factors to consider when taking great landscape photos. From choosing the right equipment and finding the perfect composition to adjusting your camera settings and editing your photos, each step plays an important role in creating a visually stunning image. In this blog post, we will focus on the key instructions for taking great landscape photos, using a variety of techniques to help you achieve stunning results. By following these guidelines, you’ll be able to capture breathtaking landscape photos that showcase the natural beauty of the world around us. So let’s dive in and explore the art of taking great landscape photos!
Here’s a step-by-step guide to taking great landscape photos:
1. Choose the right equipment
- Determine your budget: Before you start looking for equipment, it’s essential to determine how much you’re willing to spend. This will help you narrow down your options and prevent you from overspending.
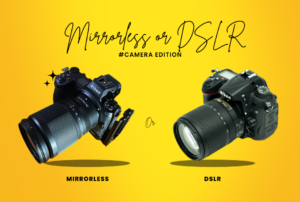
- Choose a camera: When it comes to landscape photography, you’ll want a camera with a high-resolution sensor, good dynamic range, and weather sealing. If you’re just starting, a DSLR or mirrorless camera with a kit lens will suffice. However, if you have a larger budget, you can invest in a full-frame camera or a medium format camera for even better image quality.
- Select a lens: The lens you choose will play a crucial role in the outcome of your landscape photos. Generally, wide-angle lenses are ideal for landscape photography, as they allow you to capture a broad field of view. Look for a lens with a focal length of around 16-35mm, depending on your camera’s sensor size.
- Tripod: A tripod is a must-have for taking a great landscape photo, as it allows you to stabilize your camera and capture sharp images. Look for a tripod that is lightweight and sturdy enough to support your camera and lens.
- Filters: Filters can help you enhance your landscape photos by controlling light and reducing glare. Consider investing in a polarizing filter, which can darken skies, reduce reflections, and increase contrast.
- Backpack: Lastly, you’ll need a backpack to carry all your equipment. Look for a backpack that is comfortable to wear and has enough room to store your camera, lens, tripod, filters, and any other accessories you may need.
Check our featured article in selecting 5 Best MIrrorless Cameras that doesn’t break the bank. If you are like that doesn’t know what choose between DSLR and Mirrorless Camera, this artile might help you.
2. Consider the lighting
Early morning or late afternoon light is ideal for landscape photography, as the low angle of the sun creates long shadows and warm tones.
- Determine the time of day: The first step in considering lighting for landscape photography is to determine the time of day you want to take your photos. Generally, the best times to shoot are during the golden hours, which are the first hour after sunrise and the last hour before sunset. During these times, the light is softer, warmer, and creates long shadows, which can add depth and dimension to your photos.
- Check the weather forecast: It’s also essential to check the weather forecast before heading out to take your landscape photos. Overcast and cloudy days can provide even lighting, which is ideal for capturing subtle details and colors in landscapes. However, if you’re looking to capture dramatic skies or sunsets, you’ll want to head out on clear days.
- Choose the right location: Location is critical to taking a great landscape photo. It can also impact the lighting in your photos. Consider the direction of the sun and how it will interact with your chosen location. For example, if you want to capture a waterfall, you’ll want to visit it when the sun is not shining directly on it, as this can create harsh shadows.
- Use filters: Filters can help you control the lighting in your landscape photos. For example, a polarizing filter can reduce glare and increase contrast, while a neutral density filter can help you capture long exposures and create motion blur in waterfalls or clouds.
- Consider the foreground and background: Finally, consider the foreground and background of your photo when considering lighting. The light in the foreground can affect the overall feel of the photo, while the light in the background can create depth and interest.
3. Find the right composition
Look for elements that will add interest to your great landscape photo, such as mountains, trees, water or people. Try to balance these elements and look for leading lines that will guide the viewer’s eye through the scene.
- Determine the focal point: Before you start taking photos, determine the focal point of your landscape scene. This can be a mountain peak, a waterfall, a tree, or any other element that you want to be the main focus of your photo.
- Use the rule of thirds: The rule of thirds is a basic principle of composition in photography that suggests dividing your frame into thirds horizontally and vertically. Place the focal point at the intersection of these lines to create a balanced and visually appealing composition.
- Pay attention to foreground and background: Including foreground and background elements can add depth and interest to your landscape photos. Look for leading lines, patterns, or contrasting elements to create a sense of scale and perspective.
- Consider the horizon line: The horizon line can be a powerful tool in landscape photography. Position it higher in the frame to emphasize the sky or lower to emphasize the foreground.
- Experiment with angles and perspectives: Don’t be afraid to experiment with different angles and perspectives to create a unique composition. This can mean getting down low or shooting from a higher vantage point to capture the scene from a new perspective.
- Crop your photos: After taking your photos, don’t be afraid to crop them to improve the composition. You can use cropping to adjust the placement of the focal point or remove any distracting elements from the frame.
4. Set your camera settings
Choose a low ISO to reduce noise, set your aperture to a high number to increase the depth of field and keep more of the scene in focus, and use a slow shutter speed to create a sense of movement or to capture the flow of water.
- Use the lowest ISO possible: Taking a great landscape photo is typically done in bright lighting conditions, so using a low ISO setting is ideal to avoid introducing unwanted noise in your photos. Start by setting your camera to its lowest ISO setting, such as ISO 100 or 200.
- Choose the right aperture: Aperture controls the depth of field in your photos, which can be used creatively to create sharp or blurry backgrounds. For landscape photography, you’ll typically want to use a smaller aperture, such as f/8 or f/11, to ensure that everything in your frame is in sharp focus.
- Use a tripod: Using a tripod is essential in landscape photography, as it allows you to use slower shutter speeds without introducing camera shake. This can help you capture more detail and create smooth water or cloud movements.
- Use a polarizing filter: A polarizing filter can help reduce glare and increase color saturation in your landscape photos. This can be especially helpful when shooting around water or in bright lighting conditions.
- Shoot in RAW: Shooting in RAW format allows you to capture more image data, which can be used in post-processing to adjust exposure, color, and other settings.
- Consider the shutter speed: The shutter speed controls how long the camera’s sensor is exposed to light. For landscape photography, you may want to use a slower shutter speed to create blur in waterfalls or clouds. However, be sure to use a tripod to avoid camera shake.
5. Use a polarizing filter
A polarizing filter will reduce glare and enhance the colors in your landscape photos.
- Use the lowest ISO possible: Landscape photography is typically done in bright lighting conditions, so using a low ISO setting is ideal to avoid introducing unwanted noise in your photos. Start by setting your camera to its lowest ISO setting, such as ISO 100 or 200.
- Choose the right aperture: Aperture controls the depth of field in your photos, which can be used creatively to create sharp or blurry backgrounds. For landscape photography, you’ll typically want to use a smaller aperture, such as f/8 or f/11, to ensure that everything in your frame is in sharp focus.
- Use a tripod: Using a tripod is essential in landscape photography, as it allows you to use slower shutter speeds without introducing camera shake. This can help you capture more detail and create smooth water or cloud movements.
- Use a polarizing filter: A polarizing filter can help reduce glare and increase color saturation in your landscape photos. This can be especially helpful when shooting around water or in bright lighting conditions.
- Shoot in RAW: Shooting in RAW format allows you to capture more image data, which can be used in post-processing to adjust exposure, color, and other settings.
- Consider the shutter speed: The shutter speed controls how long the camera’s sensor is exposed to light. For landscape photography, you may want to use a slower shutter speed to create blur in waterfalls or clouds. However, be sure to use a tripod to avoid camera shake.
Read our featured article on various types of Lens Filters and their usage.
6. Use the rule of thirds
Divide the frame into thirds both horizontally and vertically and place the main subject of your photo along one of these lines, or at the intersection of two.
- Visualize your frame: Before taking your great landscape photo, visualize your frame divided into a 3×3 grid, with two horizontal lines and two vertical lines.
- Place your focal point: Identify the main point of interest in your landscape scene, whether it’s a mountain peak, a tree, or any other element you want to highlight. Place this focal point at one of the intersection points of the grid lines.
- Balance the elements: Use the lines of the grid to balance the other elements in your photo. For example, if you have a large tree in the foreground, place it along one of the vertical grid lines, while the horizon should fall along one of the horizontal lines.
- Avoid placing your subject in the center: While it’s tempting to place your subject in the center of the frame, this can result in a static and uninteresting composition. Instead, try placing it off-center using the rule of thirds to create a more dynamic and visually appealing composition.
- Experiment with different placements: Don’t be afraid to experiment with different placements of your focal point using the rule of thirds. Try moving it around to different intersection points of the grid lines to see which composition looks the best.
7. Take multiple shots
Shoot, shoot… and did I say more shots?
This is the only way in to takeing a great landscape photo.
Even professionals do this multiple times.
Take multiple shots at different exposures and focal lengths to ensure you get the best result.
8. Edit your photos
Use photo editing software to enhance the colors, adjust the brightness and contrast, and crop the image to your liking.
- Choose your editing software: There are a variety of editing software options available, including Adobe Lightroom, Photoshop, and Capture One. Choose the one that works best for you and your editing style.
- Adjust exposure: Adjusting the exposure can help bring out details in your landscape photo that may be too dark or too bright. Use the exposure slider to increase or decrease the overall brightness of your photo.
- Adjust contrast: Contrast can help give your photo more depth and dimension. Adjust the contrast slider to make your dark areas darker and your light areas lighter.
- Adjust color temperature: The color temperature of your photo can affect the overall mood and feel of the image. Adjust the color temperature slider to make your photo warmer (more yellow/orange) or cooler (more blue).
- Adjust saturation: Adjusting the saturation can help bring out the colors in your landscape scene. Use the saturation slider to increase or decrease the intensity of the colors in your photo.
- Sharpen your photo: Use the sharpening tool to make your landscape photo appear crisper and more detailed. Be careful not to over-sharpen, which can result in a noisy and unnatural-looking photo.
- Crop and straighten: Use the crop and straighten tools to adjust the composition of your photo. This can help remove any distracting elements from the frame and improve the overall balance of the composition.
- Use selective adjustments: Use selective adjustments to adjust specific areas of your photo, such as darkening the sky or lightening the foreground. This can help bring out details and make your landscape photo look more balanced.